Setting Up and Configuring FortiGate Firewall Using GNS3
Practical Firewall Deployment and Basic Connectivity Testing
Setting Up and Configuring FortiGate Firewall Using GNS3
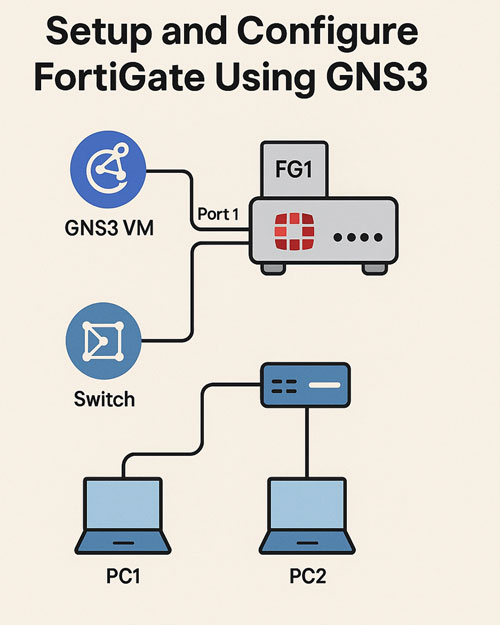
In this project, I deployed and configured a FortiGate firewall using GNS3 to simulate a realistic network environment. I began by changing the firewall hostname to FG1 for easy identification. I then found the subnet and gateway IP information for the GNS3 VM network and assigned a valid IP address to Port 1 of the FortiGate, enabling access protocols such as HTTP, HTTPS, SSH, and Ping. After configuration, I successfully pinged the GNS3 VM gateway from the firewall to verify initial connectivity.
Next, I examined the firewall’s ARP table to verify the MAC address associated with the GNS3 VM. I proceeded to configure Port 2 of the FortiGate with the IP address 192.168.20.1/24, allowing Ping traffic on that interface. I then set a default route on the firewall, pointing to the GNS3 VM gateway for external connectivity and configured Google’s 8.8.8.8 as the primary DNS server. After setup, I successfully verified internet connectivity from the firewall.
To complete the setup, I connected two PCs to Port 2 via a switch, manually assigning them IP addresses 192.168.20.10/24 and 192.168.20.11/24. I conducted connectivity tests by pinging the firewall’s gateway IP from the PCs, ensuring smooth internal network communication. I confirmed that the firewall could also reach the GNS3 VM gateway. Through these steps, I demonstrated hands-on proficiency in FortiGate basic setup, network interface configuration, routing, and connectivity testing within a virtual lab environment.


